
Cabinet selection and initial size adjustment
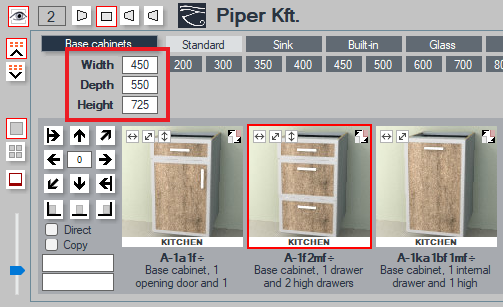
- Click on the thumbnails to select a specific piece of cabinet. This will be highlighted by a red frame. The initial dimensions of the selected furniture will appear in the Width, Depth, and Height fields.
- If the size of the furniture in a given dimension is dynamic, meaning it can be freely adjusted within a certain range, the field will have a white background and can be edited. If the size is fixed, the field will be colored and non-editable.
- If the filter direction is set to the top position (see Filter), fixed values assigned to the furniture will appear next to the corresponding dimension, if any. You can click on the desired size to select a new initial value. This is possible even if the dimension of the furniture is not dynamic, meaning it exists only in multiple fixed sizes. Intermediate values cannot be selected in this case.
- If the size of the furniture in a given dimension is dynamic, meaning it can be freely adjusted within a certain range, the field will have a white background and can be edited. If the size is fixed, the field will be colored and non-editable.
- Dynamic size ranges and fixed sizes can be set or modified on the Dimensions, positions page, individually for each piece of furniture.
- Use the icons on the right side to navigate the furniture list forward, backward, to the end, or to the beginning.
-
If you want to view multiple pieces of furniture at once, switch to the two-row view. In this case, the images will be smaller, and their codes and descriptions will not be visible. The thumbnails can either be an automatically generated stylized image based on the basic elements of the furniture or a saved jpg image. The size of the generated images can be adjusted with the left slider.
-
This button opens a small window where you can create thumbnails for various elements, such as furniture, fronts, etc.
Placing cabinet in the room
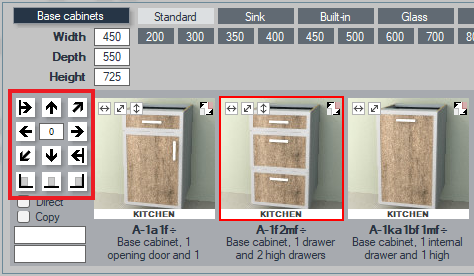
- The selected piece of furniture is always assigned to the currently active wall. The insertion icons are located to the left of the furniture thumbnails. These are used to insert the selected furniture.
- The bottom three icons place the furniture at the left or right edge or in the center of the current wall. If you hold down the Ctrl key while placing the furniture at the wall edges, it will align with the bisector of the current corner.
- The arrow icons allow you to position the furniture next to, in front of, behind, below, or above an already placed and selected item.
- The line-arrow icons align the furniture so that the left or right sides are flush, for example, placing an upper element above a lower one.
- The bottom three icons place the furniture at the left or right edge or in the center of the current wall. If you hold down the Ctrl key while placing the furniture at the wall edges, it will align with the bisector of the current corner.
- During placement, the furniture assumes its assigned initial height and depth positions.
- If the direct switch is enabled, the new item will take on the depth and height positions of the selected furniture, allowing you to place a new piece directly next to an existing piece in the space.
- With the copy switch enabled, you can create a copy of an already placed and selected piece of furniture in the direction indicated by the arrows using the insertion icons.
- If the direct switch is enabled, the new item will take on the depth and height positions of the selected furniture, allowing you to place a new piece directly next to an existing piece in the space.
- If you want to place furniture not directly next to each other or directly against the wall, you can specify the desired distance by entering a value between the arrows.
- Furniture can also be dragged with the mouse. Simply start the selected item briefly to the left or right. In this case, the item will be placed on the left or right side of the wall or the appropriate side of an already placed and selected piece of furniture.
Replace button, cabinet replacement

-
If the furniture has dynamic size ranges, the replace button will appear in the upper right corner of the thumbnail. This allows you to replace the selected piece of furniture in the arranger with the one selected here. This avoids the need to delete, resize, and reposition the furniture when changing to a different structure. This function is only applicable for replacements within the same group.
Corner solution
- First, place the corner cabinet. Diagonal (Y) and L-shaped corner cabinets are only available for placement on the left side of the wall, as they are diagonally symmetrical. If you want to place it in the right corner, you must place it on the left edge of the wall to the right. You can then continue placing furniture to the right, switch walls to the left, and place elements continuously to the left next to the newly selected corner cabinet.
Prohibited elements
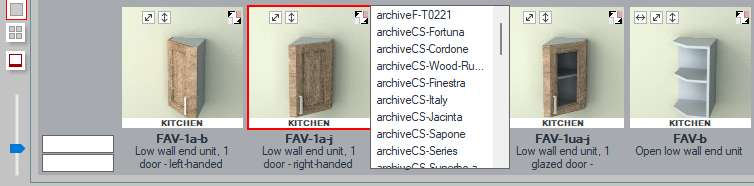
- If the insertion icons do not appear when you click on the thumbnail, the furniture cannot be placed in the room. This happens when the furniture includes a special front that is only available in a few types, and the current front is not among them.
- If you right-click on the thumbnail, a small list appears showing the fronts that can be used with the furniture. You must then go to the properties page and select one of the fronts listed. After returning, the insertion icons will appear, and you can place the furniture in the room.
- This filtering does not work in reverse. Therefore, if you change the front to one that is not on the list after arranging, the program will not notify you, but there will be nothing in place of the front!
- If you right-click on the thumbnail, a small list appears showing the fronts that can be used with the furniture. You must then go to the properties page and select one of the fronts listed. After returning, the insertion icons will appear, and you can place the furniture in the room.
Keywords: #cabinet placement #cabinet selection #initial size #prohibited elements #replace button #cabinet replacement #corner cabinet #corner solution
Comments
0 comments
Please sign in to leave a comment.